
How to Build an Edge Grain Butcher Block
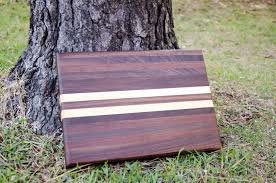
Edge grain cutting board construction is what most people consider a traditional butcher block. It is made by laminating multiple strips of wood the same length and width to form a thick wood cutting board. Here I will walk you through the steps on how to build an edge grain butcher block.
Check out this video showing the steps I took to build this particular butcher block:
Step 1: Select and mill the wood
Depending on your tool availability and ability to plane and joint wood, you may want to select pre-surfaced s4s lumber to give you a jump start. You can see my article on the best wood for a cutting board to get a better idea of what options you have to build an end grain butcher block out of.
Once you have your wood selected and ready to go, you want to cut it all to length. I wanted this butcher block to be 18″ long, so I cut all of my boards slightly larger than this, 18.5″ or so.
Next, you want to take these boards and rip them slightly wider than your desired finished thickness of the butcher block, since you will be orienting these boards on edge (hints the name edge grain). For this board, I wanted a 2″ thickness, so I cut all of my boards slightly wider than this to allow some form for planning and sanding the board after glue-up.
Depending on your desired width for your cutting board and the thickness of your boards, make sure you have enough strips cut. Since I wanted a roughly 12″ wide board and my wood were slightly over .75″ thick, I needed 15 of these 2″x18″ strips. Once you have enough, you can play around with their arrangement to get the desired pattern in your finished board.
Step 2: Glue the wood strips together in edge grain orientation
Now that you have all of your wood strips arranged in the order you want them and standing on edge, you can begin to glue them up. If you do not have a planer to flatten the board after this process, you want to be extra careful to get your boards lined up perfectly to minimize the sanding required to flatten the board after the glue dries.
I use Titebond III for all of my cutting boards and butcher blocks. The Glu Bot is one of my favorite tools in the shop and makes applying the glue much easier. You can see is in use during the video of building this butcher block. Once you apply and spread the glue, you want to clamp your boards together. This can be done with a variety of different clamps, I typically reach for the parallel clamps or pipe clamps for this task.
Read also: How to Build an End Grain Cutting Board
Step 3: Flatten and square the butcher block
You can use a drum sander, belt sander, or planer to flatten the board at this stage, the planer will go the fastest so that is what I choose. Once the butcher block is flat on both sides, you will want to square up the edges using either a table saw with cross cut sled, radial arm saw, track saw, or circular saw with a guide.
Step 4: Route the edges and sand
Now it is time to route all of your edges and sand the board. For this board I chose to use a chamfer bit, but there are many different profiles and router bits you can choose here. If you didn’t want to do this, you could just sand the edges to take their sharpness off.
After routing the edges of the butcher block, you want to sand the board with a random orbit sander or whichever your preferred method may be. I typically sand up to 220, raise the grain by spraying on some water, and finish sanding up to 320 and then 600 by hand.
Step 5: Apply finish, install feet if desired
After your edge grain butcher block is baby-bottom smooth, it’s time to apply some oil! I only use food-safe mineral oil followed by my own mineral oil/beeswax mix for protection. Just keep applying the mineral oil until the board doesn’t seem to want to absorb any more, the end grain will be the most thirsty. I usually apply around 4 heavy coats of mineral oil followed by the wax mix after it has had time to absorb all of the oil.
If you wanted to install rubber feet, now is the time to do that. As you can see on the video or building this butcher block, I chose to install feet on this board.
I hope you enjoyed this tutorial. Please also check out the tutorial on How to Build an End Grain Cutting Board and the list of Tools from my Shop.